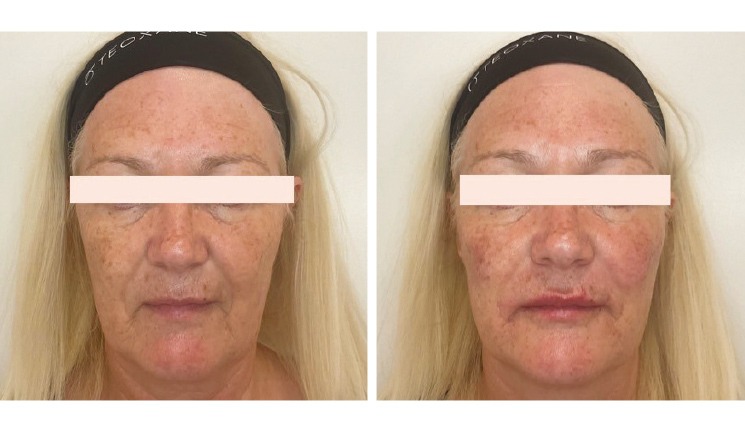
A 58-year-old patient presented to my clinic with concerns of looking old, having become aware of drooping and noticing a sunken mouth. She had no medical history of note and had received dermal fillers many years ago with no issues.
During the consultation, I used ageing anatomy to explain to her the changes that she was experiencing and pointed out that her main concerns were due to bone reabsorption, mainly in the maxilla. When assessing her face, I noted that she had some characteristic enlargement of the piriform aperture leading to deepening of the nasolabial folds, and had signs of deflation and ptosis in the medial and lateral suborbicularis oculi fat (SOOF). Her most superficial middle cheek fat pad was also showing ptosis and this created a mid-cheek groove. Periorally, she had rhytids due to the loss of subcutaneous fat.
We discussed these issues in depth and decided together that I would address her mid-face and perioral region with appropriate dermal filler.
Product selection and technique
For treating the mid-face, I decided to use Teosyal PureSense Ultra Deep (PS Ultra Deep) because of its strong lifting capacity. I injected into the periosteum in the region of the medial cheek fat, and placed a small amount in the medial and lateral SOOF. I used a 27 gauge needle, avoiding the infraorbital foramen and the transversal artery, which lies inferior to the zygoma. I used boluses so as to provide structural support, using a total of 1.2ml.
I then fanned 2.4ml of RHA 4 into the preauricular sulcus area using a 25 gauge cannula, concentrating on the mid-cheek groove. RHA 4 is a powerful volumiser, and has a fantastic stretch capacity so it creates a lovely contour to the cheek, while also respecting natural facial expressions.
To help support the cheek area, I injected another 0.6ml of PS Ultra Deep into the deep piriform aperture using a 27 gauge needle, deep to the periosteum. It’s important not to forget this area when treating the mid-face as I’ve found that it’s a really effective area to augment. To create support for the perioral area I injected 1.0ml of RHA 3 into the nasolabial folds, superficially using a 25 gauge cannula. RHA 3 has great strength and integrates beautifully into the skin. I also used 1ml of this filler to inject the marionette lines, the area medial to the mandibular ligament which is called the marionette compartment and then the mental crease, all using a fanning technique.
Finally, I treated the lips themselves. When injecting the superior perioral rhytids I always use RHA® 1 as it’s a really sophisticated blend of cross-linked and non-cross-linked filler. We don’t want to create any volume in the upper lip, so using a fine filler with a 25 gauge cannula can gently subsize the retinacula cutis fibres, particularly when using a fanning technique. The patient had one or two slightly deeper lines, so I also injected those very superficially using micro boluses intradermally, avoiding the philtral columns so that I didn’t risk going into the columella arteries.
I also injected the vermillion border to give the lips more definition, shape and structure. I used a 4mm 30 gauge needle to introduce RHA Kiss into the virtual canal, allowing it to travel through without having to use multiple injection points. Overall I injected 1.7ml into the lip area.
The patient was delighted with her result because although we used quite a lot of filler, she got a nice subtle outcome, and she had no side effects to note.
Top tips for success
The most important thing I recommend is getting to know your ATP – this stands for anatomy/ageing/assessment, technique and products. When analysing your patient’s face, I always like to advise practitioners to follow a superior to inferior way of assessing, as well as lateral to medial.